firmware

Building and Uploading the Rockit Firmware on Mac OS X

Like the Meeblip synth, the supported tool for Rockit development is AVR Studio which can only be used with Windows. It’s possible to build the Rockit code from the Mac OS X command line using the avr-gcc compiler and a new Makefile. The avr-gcc compiler is available for installation on Mac OS X through MacPorts. You’ll also need to install avrdude which is also available from MacPorts.

I’ve adapted this Makefile to build the Rockit code. This Makefile may also work with Linux, although I’ve not tried it. Simply place it in the directory with the Rockit source (make sure it’s named Makefile, not Makefile.txt) and type:

make
to build the source, then:
make hex
to create the Rockit.hex file for downloading. I’ve set up the Makefile to support the Sparkfun Pocket AVR programmer using avrdude so typing:
make install
will also upload the generated Rockit.hex file to the Rockit. If you’re using a different programmer, you’ll need to edit the writeflash target in the Makefile (line 199).
Alternatively, the avrdude command to upload the firmware is for the Sparkfun Pocket AVR programmer is:
avrdude -c usbtiny -p m644p -U flash:w:Rockit.hex

The avrdude options above can be modified to use your programmer.

The Rockit kit doesn’t ship with an AVR programming header, so you’ll need to solder your own header on the board. Here’s the correct way to connect the Sparkfun Pocket AVR programmer to the AVR header on the Rockit board:
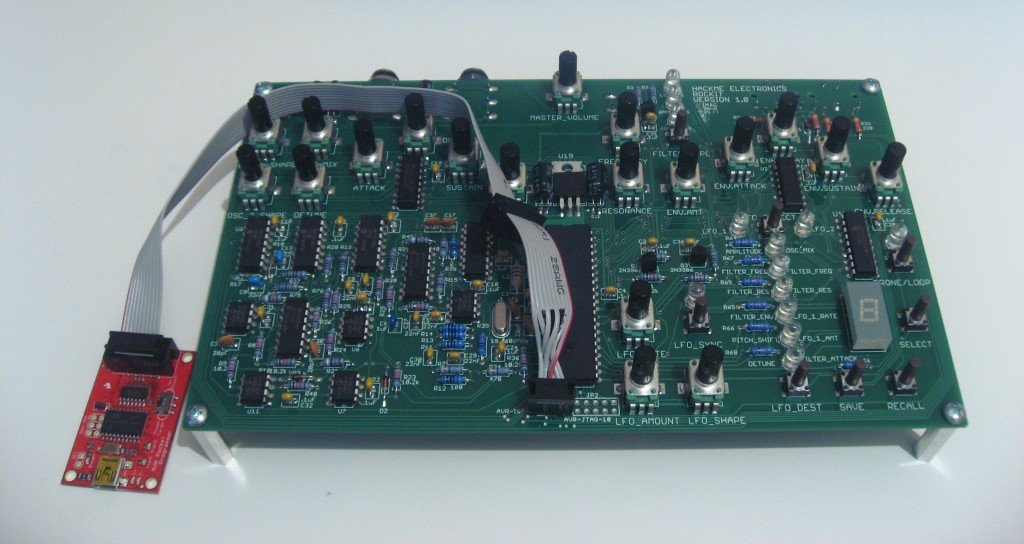
Hackme Rockit with Sparkfun Pocket AVR programmer connected
Hackme Rockit with Sparkfun Pocket AVR programmer connected to the AVR programmer header. Note the orientation of the connector, with the wires facing toward the top of the board.

The header must be put on the top of the board so that the header pinout lines up with the AVR programmer connector. With a standard header on the board, this looks like it will make it fairly tight against the case, although I’ve yet to try assembling a Rockit case.

Building and Uploading the Rockit Firmware on Mac OS X Read More »

Building the MeeBlip Firmware on Mac OS X

Here’s how you can build the Meeblip firmware on Mac OS X. For Windows, AVR Studio can be used to build the firmware. For Mac OS, the command line tool avra can be used, and presumably this will also work on Linux, although I’ve not tried this. Using avra to build the firmware was discussed on the MeeBlip forum, but I’ve summarised the steps below. This also includes the step to download the firmware to the MeeBlip microcontroller using the Sparkfun Pocket AVR programmer and avrdude. Full instructions for downloading the firmware can be found on the MeeBlip firmware page.
1. Download and build avra for Mac OS X and add it to your path
2. Install avrdude (one easy way is using Macports)
3. Locate the library file m32def.inc in avra (in avra-<version>/includes/) and copy it to your meeblip source directory containing meeblip.asm
4. Run the c pre-processor on m32def.inc to remove #define etc:
    cpp -P m32def.inc > temp
    mv temp m32def.inc
5. Remove the long comment in m32def.inc on line 465 as it is not compatible with avra.
6. Remove all comments (at the end of lines starting with a semi-colon) from meeblip.asm starting with a \ following the comment semi-colon and zero or more spaces as they are also not compatible with avra (these will be removed from future versions of the source). For example, remove comments from the end of the lines that have any of the following semi-colon backslash combinations below:
  ;\
  ; \
  ;  \
  ;   \
7. Assemble the meeblip source with:
 
    avra meeblip.asm
8. Download the assembled hex using avrdude:
 
    avrdude -c usbtiny -p m32 -U flash:w:meeblip.hex

If you’re using a different programmer, you may need to replace the avrdude -c option with the one for your programmer. Here’s a picture of how the Sparkfun Pocket AVR Programmer should appear connected to the MeeBlip:

Meeblip ISP Header Orientation
Meeblip 1.31SE board with a Sparkfun Pocket AVR Programmer connected. Note the orientation of the connector, with the wires facing away from the audio and MIDI ports.

Building the MeeBlip Firmware on Mac OS X Read More »